Making Herbal Balms: Your Complete Beginner’s Guide
This guide addresses herbal balm-making from a Western herbalism perspective. The preparation methods and featured herbs (calendula, plantain, arnica, comfrey, lavender) are part of European and Western herbal traditions.
Why Learning Balm-Making Matters
Cost Savings:
Commercial herbal balms cost $20-30 NZD for tiny tins. Homemade balms cost $3-5 for the same amount — an 85% savings. One batch makes enough to last months or give as gifts.
Empowerment:
Understanding the simple chemistry (oil + beeswax = balm) removes the mystery. You control ingredients, customise for your needs, adjust ratios for perfect consistency.
Accessibility:
Basic supplies (infused oil, beeswax, containers) available throughout NZ. Many herbs grow wild (plantain, calendula self-seeds). No specialised equipment needed — just a double boiler and jars.
Quality Control:
You know exactly what’s in your balm — no synthetic fragrances, preservatives, or fillers. Choose organic ingredients, control herb quality, ensure freshness.
Connection to Herbs:
Balm-making is the satisfying culmination of growing/foraging herbs, infusing oils, and creating finished remedies. It’s herbalism made tangible.
What This Guide Will Teach You
You’ve probably seen herbal balms in shops selling for $20-30 NZD for a tiny tin. What if I told you that you could make the same thing at home for just a few dollars? Better yet, you’ll know exactly what’s in it, and you can customise it for whatever your skin needs.
This guide will walk you through everything you need to know about making herbal balms, from understanding why they work to creating your first batch. We’ll keep things simple, practical, and focused on what actually matters. By the end, you’ll have the confidence to turn a jar of infused oil and a block of beeswax into powerful skin remedies.
What Exactly Is a Balm?
A balm is simply herbal oil mixed with beeswax to make it solid. That’s it. You’re taking all those healing compounds you’ve extracted into your infused oil and giving them a way to stay on your skin longer, working their magic.
Think of it this way: if you rub plain oil on your skin, it absorbs relatively quickly or rubs off. But when you add beeswax, you create a protective barrier that holds those herbal compounds against your skin, letting them absorb slowly and deeply over hours rather than minutes.
Why This Matters
Your skin is remarkably good at absorbing oil-soluble compounds. Many of the most powerful plant medicines—resins, essential oils, fat-soluble vitamins—dissolve beautifully in oil. When you create a balm, you’re making a delivery system that:
Protects damaged or dry skin from further moisture loss
Provides a slow, sustained release of medicinal compounds
Creates a physical barrier against irritants
Stays put exactly where you need it
This makes balms perfect for targeted treatment of specific areas: dry patches, minor cuts and scrapes, muscle aches, chapped lips, or anywhere you need concentrated, long-lasting skin support.
The Science Behind How Balms Work
Let’s break down what’s happening at a chemical level, because understanding the “why” helps you make better choices about what you’re creating.
The Oil Component
Your infused herbal oil is doing the heavy lifting here. When you infused your herbs in oil (using the methods from our infused oil guide), you extracted lipophilic compounds—substances that dissolve in fat but not in water. These include:
- Essential oils: The aromatic volatile compounds that provide
antimicrobial, anti-inflammatory, and analgesic effects - Resins: Sticky plant exudates with wound-healing and protective
properties - Carotenoids: Pigments like those in calendula that support skin
regeneration - Fat-soluble vitamins: Including vitamin E, which protects both
the oil and your skin from oxidation
These compounds are already in your oil, waiting to be delivered to your skin. The balm format just gives them a better way to get there and stay there.
The Beeswax Component
Beeswax is nature’s perfect structurant. It’s a complex mixture of esters, fatty acids, and hydrocarbons that, when combined with oil, creates a semi-solid consistency.
Here’s what beeswax does:
- Creates structure: Turns liquid oil into a spreadable solid
- Forms an occlusive barrier: Reduces transepidermal water loss
(TEWL), meaning it prevents your skin’s moisture from evaporating - Enhances penetration: By trapping moisture and slightly
increasing skin temperature, it helps drive those medicinal compounds deeper into skin layers - Adds its own benefits: Beeswax itself has mild anti-inflammatory
and antimicrobial properties
The magic happens in the ratio. More beeswax creates a firmer balm (like a lip balm stick). Less beeswax creates a softer salve (like a body butter). You’re in complete control.
When to Use Balms (And When Not To)
Perfect For:
Dry, cracked skin: The occlusive nature of balms makes them ideal for severely dry hands, feet, elbows, or any area that needs serious moisture protection.
Chapped lips: A firm balm with a high wax ratio creates the perfect lip balm that stays put.
Minor wounds and scrapes: Herbs like calendula or plantain in a balm base create a protective barrier while delivering wound-healing compounds.
Targeted muscle or joint pain: Balms let you apply herbs like arnica or ginger exactly where you need them, and they stay in place.
Nappy rash or skin irritation: The protective barrier prevents further irritation while herbs soothe existing inflammation.
Nighttime treatments: Because balms are thick and stay put, they’re perfect for intensive overnight therapy.
Not Ideal For:
Oily or acne-prone skin: The occlusive nature can trap sebum and potentially worsen breakouts. Use lighter oils or lotions instead.
Large body areas: Balms are concentrated and thick—you wouldn’t want to spread them over your entire body. Use straight herbal oils or lotions for that.
Hair or scalp treatments: Beeswax is difficult to wash out of hair. Stick with oils for hair applications.
Areas that need to breathe: Deep wounds or infections need air circulation. Balms are for closed wounds and surface conditions only.
Your First Balm: The Basic Method
Let’s walk through making your first batch. This is easier than you think.
What You Need
Ingredients:
120ml (½ cup) of your infused herbal oil (see our infused oil guide if you haven’t made this yet)
15g (about 2 tablespoons) grated or pelleted beeswax
Optional: A few drops of vitamin E oil (acts as a preservative)
Optional: Essential oils for extra therapeutic effect or scent
Equipment:
Double boiler (or a heat-safe bowl over a pot of simmering water)
Small tins or jars for storage (available at craft stores, Kmart, or Spotlight—expect to pay $1-3 each)
Kitchen scale for measuring beeswax
Spatula or spoon for stirring
Small plate or spoon for testing consistency
The Step-by-Step Process
Step 1: Set up your double boiler
Fill your pot with a few centimeters of water and bring it to a gentle simmer. Place your heat-safe bowl on top, making sure the bottom doesn’t touch the water. This indirect heat is crucial—you never want to put beeswax directly over high heat, as it can overheat and lose its beneficial properties.
Step 2: Melt the beeswax
Add your grated or pelleted beeswax to the bowl. Grated melts faster, but pellets work fine—they just take a few extra minutes. Stir occasionally as it melts. You’ll see it transform from solid to liquid fairly quickly once it reaches about 63°C.
Why this matters: Gentle, indirect heat preserves the beneficial compounds in both the beeswax and your infused oil. High direct heat can degrade delicate essential oils and other therapeutic constituents.
Step 3: Add your infused oil
Once the beeswax is fully melted, pour in your infused oil and stir well until everything is uniformly combined. You should see no streaks or separated layers—just a smooth, golden liquid.
Step 4: The crucial consistency test
Here’s the trick that will save you from disappointment: before you pour your entire batch into jars, you need to test the consistency.
Take a teaspoon of your mixture and put it on a small plate. Pop it in the freezer for 1-2 minutes (or the fridge for 3-4 minutes). This rapid cooling shows you exactly what your final balm will be like.
Test it with your finger:
- Too hard? It won’t spread easily. Add more oil (start with
10-20ml), stir well, and test again. - Too soft? It won’t hold its shape or provide enough protection.
Add more beeswax (start with 3-5g), melt it in, and test again. - Just right? It should spread smoothly but hold its shape. Think
of the consistency of commercial lip balms or body butters.
Why this matters: This simple test prevents you from having to re-melt an entire batch. Getting the ratio right the first time is much easier than fixing it later.
Step 5: Add optional extras
If you’re using vitamin E oil (which helps prevent your balm from going rancid), add it now—about ¼ teaspoon per 120ml of balm. If you want to add essential oils for extra therapeutic benefit or scent, this is the time. Remove your mixture from heat first (essential oils are volatile and will evaporate in high heat), then add 10-20 drops per 120ml of balm.
Step 6: Pour and cool
Working quickly before your mixture starts to solidify, pour it into your prepared tins or jars. Leave them uncovered until they’ve cooled completely—this usually takes 30-60 minutes depending on the size of your containers.
Why uncovered: If you put lids on while the balm is still warm, condensation forms and drips back into your balm, potentially introducing moisture that can shorten shelf life.
Step 7: Label and store
Once cool, label each container with the contents and date. Store in a cool, dark place. Your balms should last 1-2 years if stored properly.
Understanding the Ratios
The standard 120ml oil to 15g beeswax ratio (roughly 8:1 by volume) gives you a medium-firm balm that’s versatile for most uses. But you can adjust this based on your needs:
For lip balms (firm, tube-ready consistency):
Use 120ml oil to 20-25g beeswax (roughly 5:1 or 6:1)
For body balms (softer, easier to spread):
Use 120ml oil to 12-15g beeswax (roughly 8:1 to 10:1)
For very soft salves (almost like a thick cream):
Use 120ml oil to 8-10g beeswax (roughly 12:1 to 15:1)
Remember: always do the consistency test. Variables like the type of carrier oil you used for your infusion can affect the final texture, so testing is essential.
Your First Project: A Simple Healing Skin Balm
Let’s put all this knowledge into practice with a straightforward, effective recipe using herbs that are easy to find in New Zealand.
Calendula & Plantain Healing Balm
Why these herbs?
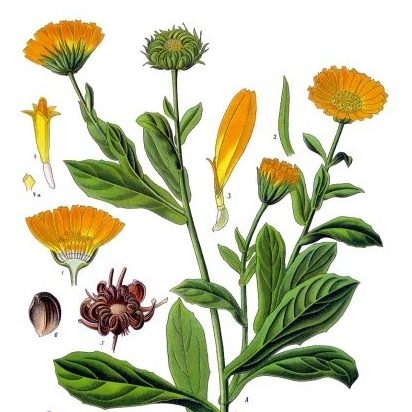
- Calendula: Contains resins and carotenoids that promote skin
healing and reduce inflammation. Perfect for minor cuts, dry patches, and general skin support. - Plantain: Rich in allantoin, which stimulates cell growth and
speeds healing. Also has natural antimicrobial properties.
What you need:
60ml calendula-infused oil (half your oil base)
60ml plantain-infused oil (the other half)
15g beeswax
¼ teaspoon vitamin E oil (optional but recommended)
15 drops lavender essential oil (optional—adds antimicrobial properties and a gentle scent)
How to make it: Follow the basic method above, using your two
infused oils combined. The combination of calendula and plantain creates a synergistic effect—each herb enhances the action of the other.
How to use it: Apply a small amount to clean, dry skin 2-3 times
daily. Perfect for dry hands, minor scrapes, cracked heels, or anywhere your skin needs extra support.
Cost breakdown (NZ):
- Dried calendula flowers: $8-12/50g (enough for multiple batches)
- Dried plantain leaf: $8-15/50g (or forage it—it’s everywhere!)
- Beeswax block: $10-15 for 250g (enough for 15-20 batches)
- Olive oil: $8-10/litre (you may already have this)
- Small tins: $1-3 each
- Total per 120ml batch: Approximately $3-5 in materials
Compare this to similar products in health stores selling for $20-30, and you can see why making your own makes sense.
Where to Source Your Materials in New Zealand
Dried Herbs
Physical stores:
Health food stores (most stock basic dried herbs)
Bin Inn (bulk dried herbs at good prices)
Some pharmacies carry herbal supplies
Online suppliers:
Herbal medicine suppliers based in NZ
International suppliers (factor in shipping time and cost)
Prices: Expect to pay $8-18 for 50g of dried flowers or leaves,
$10-20 for 50g of roots or bark.
Growing your own: Many herbs grow beautifully in New Zealand gardens. Calendula, plantain (it’s probably already in your lawn!), lavender, and rosemary are particularly easy. Initial plant cost: $8-20 each, then free herbs forever.
Beeswax
Local options:
Craft stores (Spotlight, Lincraft)
Health food stores
Beekeeping suppliers
Local beekeepers (check farmers’ markets or community boards)
What to look for: Yellow beeswax (unbleached) is preferable as it
retains more beneficial compounds. It comes in blocks, pellets, or already grated. Pellets are easiest for beginners.
Prices: $10-15 for a 250g block, $15-25 for 500g. This will make
many batches of balm.
Containers
Options:
Small tins: Spotlight, Kmart, some dollar stores ($1-3 each)
Small glass jars: Mitre 10, Bunnings, packaging suppliers ($2-5 each)
Recycled containers: Thoroughly cleaned cosmetic jars or tins you already have (free!)
Size guidance: 30-60ml containers are ideal for balms. They’re
small enough to carry in a bag but large enough to last a reasonable time.
Safety Considerations
Balms are generally very safe, but there are a few things to keep in mind:
Patch testing: Before using a new balm on a large area, test it on a
small patch of skin (like the inside of your wrist). Wait 24 hours to check for any reaction. This is especially important if you’ve added essential oils or are using a new herb.
Herb-specific concerns:
- Arnica: Never use on broken skin or open wounds. For external use only on intact skin.
- Comfrey: Contains compounds that can be problematic if absorbed in large amounts over long periods. Use short-term only and not on open wounds.
- St. John’s Wort: Can cause photosensitivity. Don’t use on skin that will be exposed to sun.
Storage: Keep balms in cool, dark places. Heat can cause them to
melt and reform with altered consistency. Light can degrade some herbal compounds over time.
Shelf life: Properly made balms with vitamin E added should last 1-2
years. Signs of spoilage include off smell, change in colour, or visible mold (very rare if made with properly dried herbs).
When to seek professional help: Balms are for minor, self-limiting
conditions. See a healthcare provider for:
- Wounds that won’t heal
- Signs of infection (increased redness, swelling, heat, pus)
- Serious burns
- Any condition that’s worsening despite treatment
- Rashes or skin conditions you can’t identify
Troubleshooting Common Issues
My balm is too hard/too soft: No problem! Just scoop it back into your double boiler, re-melt it gently, and adjust by adding more oil (if too hard) or more beeswax (if too soft). Do the consistency test again before repourring.
My balm has a grainy texture: This happens when beeswax cools too quickly or was overheated. It’s still perfectly usable, just not as smooth. To prevent it next time, use gentle heat and let it cool at room temperature (don’t put it in the fridge or freezer to speed things up).
My balm smells rancid: This means your oil has oxidsed. Prevention is key—always use vitamin E as a preservative, store in cool dark places, and make sure your herbs were completely dry before infusing. A rancid balm should be discarded.
My balm looks spotty or has specks: If you see tiny specks, it’s usually just undissolved beeswax particles (harmless). If you see fuzzy mold growth, this means moisture got in somewhere—discard immediately. This is why using completely dry herbs is so critical.
Taking It Further: Advanced Techniques
Once you’ve mastered the basic method, here are some ways to expand your skills:
Layered Balms
Create visually appealing balms by pouring different coloured layers:
- Pour first layer (perhaps with calendula for a yellow layer) and let it partially set
- Add second layer (perhaps with plantain for a green layer) once the first is firm but still slightly warm
- Continue for multiple layers
- This isn’t just pretty—it lets you combine different herbs that work well together but have distinct colours.
Whipped Balms
For a lighter, fluffier texture:
- Use a softer oil-to-wax ratio (10:1 or 12:1)
- After pouring into containers, place in the fridge
- Once balm just starts to solidify around the edges but the centre is still soft, whip it with a hand mixer
- Spoon the whipped balm back into containers
- This creates a mousse-like texture that spreads even more easily.
Specific Use Balms
Consider making specialised balms for different needs:
- Overnight hand repair: High concentration of calendula and comfrey, thicker consistency
- Lip balm tubes: Firmer ratio with cocoa butter added for extra protection
- Baby balm: Gentle herbs like chamomile and lavender, avoiding anything that could irritate delicate skin
- Muscle balm: Arnica and ginger for inflammation, with cooling peppermint essential oil
Building Your Herbal Balm Practice
Start simple. Make one basic balm using herbs you know and trust. Use it. See how it works. Notice what you like about the texture, the absorption, the effects.
Then experiment. Try different herbs. Adjust the ratios. Add essential oils. Create combinations. Keep notes on what works.
The beauty of balms is that they’re nearly foolproof—the basic chemistry is simple, the ingredients are forgiving, and even a less-than-perfect balm is usually still perfectly usable.
As you gain confidence, you’ll find yourself reaching for a jar of homemade balm as your first response to dry skin, minor scrapes, sore muscles, or chapped lips. You’ll start giving them as gifts (trust me, people love receiving handmade balms). You’ll develop your signature recipes that work perfectly for your skin and your climate.
This is herbalism at its most practical: taking simple, available ingredients and transforming them into effective remedies that you understand, trust, and can make whenever you need them.
Budget-Friendly Balm Making
Minimum cost balm ($1-3 per batch):
Ingredients:
- Infused oil: Free if using foraged herbs (plantain from lawn, self-seeded calendula) + recycled cooking oil jar
- Beeswax: $10-15/250g block = 15+ batches ($0.65-1/batch)
- Containers: Recycled jars/tins (free)
- Vitamin E: Optional ($8/bottle lasts 20+ batches = $0.40/batch)
Cost breakdown:
- $0-2 herbs (foraged free, or dried $8-12/50g lasts multiple infusions)
- $0.65-1 beeswax per batch
- $0 containers (recycled)
- $0.40 vitamin E per batch (optional)
Total: $1-3.40 per batch (makes 4-6 small tins)
Ultra-budget version (under $1/batch):
- Forage herbs (plantain, calendula): FREE
- Local beekeeper scraps/offcuts: $5/kg = $0.25/batch
- Recycled containers: FREE
- Skip vitamin E, use within 6 months
Total: $0.25/batch
Free/low-cost herb alternatives:
- Plantain (lawn weed): Free, excellent wound healing
- Self-seeded calendula: Free once planted ($3-5 seeds initially)
- Comfrey (divide friend’s plant): Free, powerful tissue repair
- Local beeswax scraps: Ask beekeepers for offcuts/unusable pieces
This makes premium herbal balms accessible regardless of budget.
Sources & Further Reading
Books:
Tourles, S. (2007). The Herbal Body Book. Storey Publishing.
Cavitch, S. M. (1995). The Natural Soap Book. Storey Publishing.
Gladstar, R. (2012). Rosemary Gladstar’s Medicinal Herbs: A Beginner’s Guide. Storey Publishing.
Scientific Literature:
Kurek-Grecka, A., et al. (2014). Bee products in dermatology and skin care. Molecules, 19(5), 6891-6904.
Sforcin, J. M. (2016). Biological properties and therapeutic applications of beeswax. Journal of ApiProduct and ApiMedical Science, 8(1), 1-7.
New Zealand Resources:
Local beekeeping associations for sourcing beeswax
Native plant nurseries for growing your own medicinal herbs
Community gardens and herbalist networks for sharing knowledge and supplies
Disclaimer: This guide does not represent rongoā Māori preparation methods or traditional Māori medicine-making. For rongoā Māori knowledge, consult qualified practitioners through Te Paepae Motuhake, local marae, or Māori health providers.
Medical Disclaimer: This guide is for educational purposes only and is not
medical advice. Balms are suitable for minor, self-limiting skin conditions. Always patch test new preparations before widespread use. Consult a qualified healthcare practitioner for serious skin conditions, wounds that won’t heal, or any condition that worsens despite treatment. If you are pregnant, nursing, taking medications, or have known allergies, seek professional guidance before using herbal preparations. The information about plant constituents and traditional uses is educational in nature and should not be interpreted as medical claims.
Note on Pricing: All prices mentioned in this guide are approximate and based on New Zealand suppliers as of December 2025. Prices vary by supplier, season, and market conditions. We recommend checking current prices with your local suppliers.
