Your Simple Guide to Picking Plants at Peak Potency
Welcome! Knowing when and how to harvest your herbs makes the difference between vibrant, powerful medicine and disappointing plant material that’s lost its oomph. This guide will help you understand the simple principles that ensure you’re getting the most from every plant you pick.
Why Harvest Timing Matters
Plants aren’t static—their chemistry changes dramatically throughout the day, the seasons, and their life cycle. That fresh basil you picked at noon in blazing sun? It has far less aromatic oil than the same plant harvested at 9am. That dandelion root you dug in spring? It’s mostly depleted compared to autumn’s starch-packed roots.
The goal: Catch the plant when its medicinal compounds are at their peak concentration.
Why this matters: Imagine spending an afternoon harvesting, drying, and storing herbs, only to find your medicine is weak and tasteless because you picked at the wrong time. Or worse—you over-harvested a special patch and it doesn’t recover. Getting timing and technique right means:
- More potent medicine from the same amount of effort
- Sustainable harvests that come back year after year
- Respect for the plants that are teaching and healing you
The Golden Rules of Harvesting
Rule 1: Time of Day Matters
Best time: Morning, after dew has evaporated but before midday heat (roughly 9-11am)
Why this works: Plants produce volatile oils (those aromatic compounds that smell wonderful and do medicinal work) in response to sunlight. By mid-morning, they’ve converted morning sun into peak oil production. But once the sun gets hot, those delicate oils start evaporating off the plant.
Practical tip: Set a reminder for 9am on harvest day. It’s that important.
Rule 2: Match the Plant Part to the Season
Spring → Leaves
- Young leaves are tender, nutrient-dense, and less bitter
- Examples: Dandelion greens, nettle tops, plantain leaves
- Why: Plants pour energy into leaf production before flowering
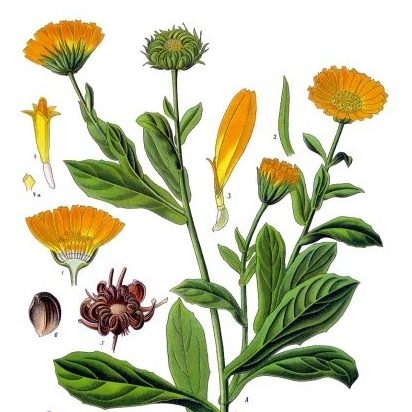
Summer → Flowers
- Harvest when fully open but not yet fading
- Examples: Calendula, chamomile, lavender, elderflower
- Why: Flowers produce maximum essential oils and medicinal compounds when blooming
Autumn → Roots & Berries
- Roots: After aerial parts die back
- Berries: When fully coloured and slightly soft
- Examples: Dandelion root, burdock root, elderberries, rose hips
- Why: Plants move energy underground for winter storage; berries concentrate antioxidants when ripe
Winter → Evergreens
- Native plants that persist year-round
- Examples: Kawakawa, pine needles, horopito
- Why: These are your only fresh options in cold months
Rule 3: Pre-Flowering is Usually Best for Leaves
General principle: Harvest leafy herbs before the plant flowers
Why: Once a plant starts flowering, it shifts energy from leaf production to reproduction. Leaves often become tougher, more bitter, and lower in the compounds you want.
Exceptions:
- Some herbs (like lemon balm) can be harvested during flowering if you harvest regularly
- If you want both leaves AND flowers, harvest leaves first, then let some plants flower
Rule 4: Weather Matters
Ideal conditions:
- Dry weather for 2-3 days before harvest
- No rain in forecast for harvest day
- Low humidity
Avoid harvesting:
- During or immediately after rain (excess moisture promotes mold during drying)
- In very humid conditions
- When plants are water-stressed from drought
NZ Regional Harvesting Considerations
New Zealand’s diverse climate zones mean harvest timing varies significantly by region:
High Humidity Regions (Auckland, Northland, Coromandel, Bay of Plenty):
- Finding dry weather can be challenging year-round
- Harvest during offshore winds (westerlies) when humidity drops
- Process immediately—herbs degrade faster in humid conditions
- Autumn often drier than summer in northern regions
- Morning harvests especially important (get in before sea breeze brings moisture)
Windy Regions (Wellington, Coastal Areas):
- Wellington’s wind dries dew quickly—can harvest earlier
- Secure lightweight herbs (calendula petals) in baskets immediately
- Take advantage of dry nor’west conditions (very low humidity)
- Strong winds can stress plants; check they’re well-hydrated before harvesting
Dry Regions (Central Otago, Canterbury):
- Extended harvest windows due to low humidity
- Watch for drought stress—don’t harvest water-stressed plants
- Nor’westers provide ideal drying conditions
- Autumn ideal for most harvesting (less extreme temperatures)
Coastal vs. Inland:
- Coastal: Higher humidity, salt spray (rinse herbs thoroughly)
- Inland: Lower humidity, greater temperature extremes
- Altitude affects timing: higher altitude = later spring, earlier autumn
Timing for Your Region:
- Keep a harvest journal noting local weather patterns
- Your microclimate may differ from general NZ advice
- Observe plants in your specific location over seasons
Plant-Specific Harvesting Guide
Leaves & Aerial Parts (Mint, Basil, Lemon Balm, Sage, Thyme)
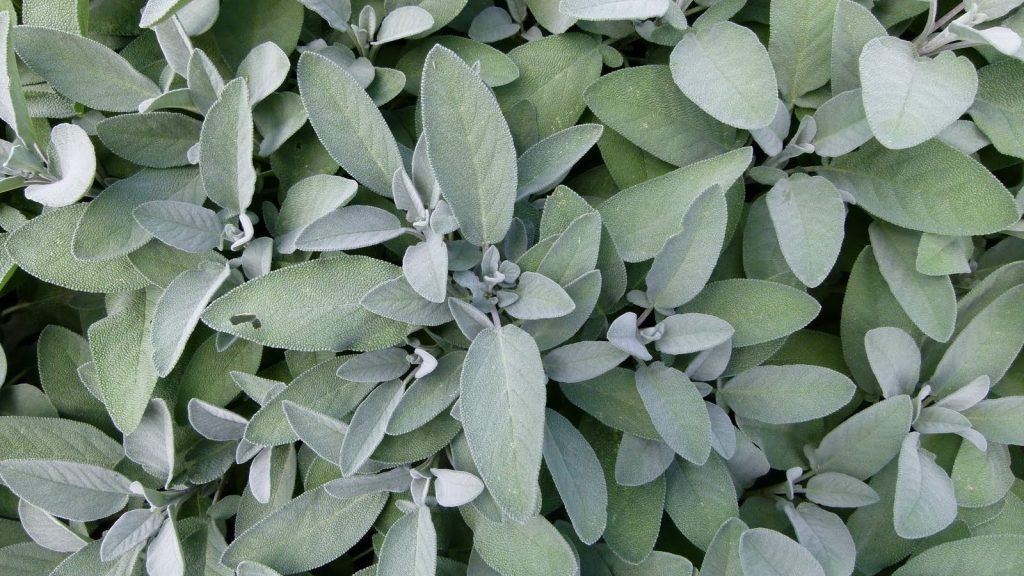
When: Before flowering, mid-morning after dew dries
How: Cut stems above a leaf node (the bump where leaves emerge). This encourages bushy regrowth.
How much: Never more than 1/3 of the plant at once
Tool: Sharp scissors or pruning shears
Flowers (Calendula, Chamomile, Lavender)
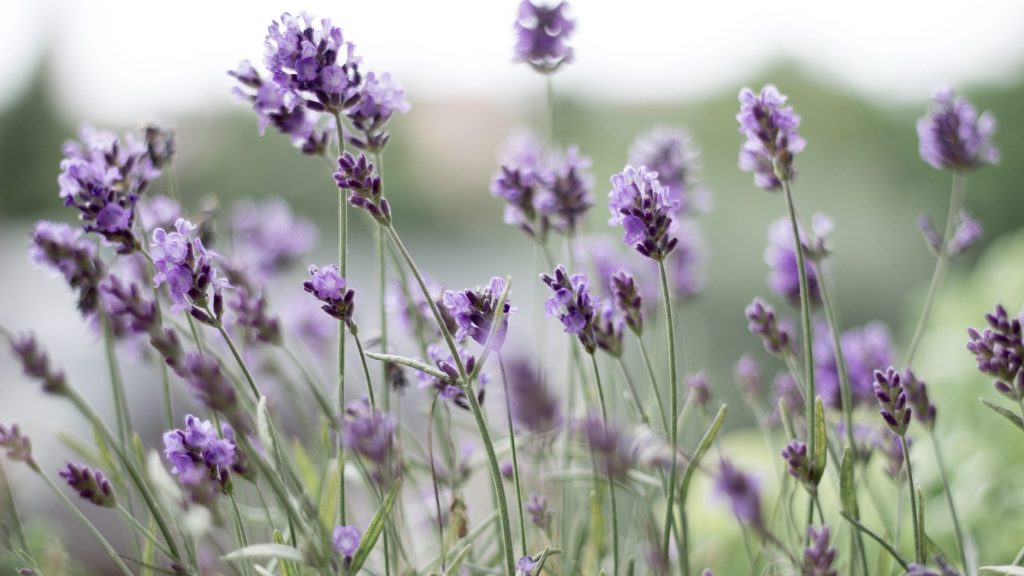
When: Fully open blooms, not yet faded, dry morning
How:
- Individual flowers (calendula): Pluck flower heads, leaving a bit of stem
- Stem bunches (lavender): Cut entire flowering stems
How much: Leave some flowers for pollinators and seed production
Tool: Scissors or fingers
Roots (Dandelion, Burdock)
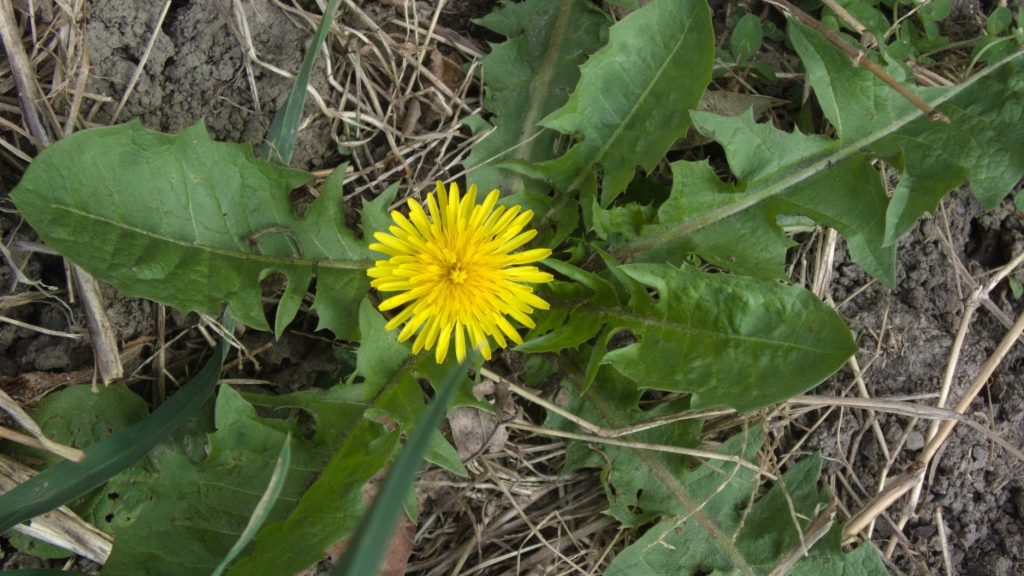
When:
- Autumn (March-May in NZ): After leaves die back—this is optimal
- Late winter/early spring (August-September in NZ): Just before new growth begins
How:
- Loosen soil around plant with digging fork
- Carefully lift to avoid breaking the root
- For perennials, you can replant the crown to regenerate
How much: Only from abundant populations; don’t decimate an area
Tool: Digging fork or sturdy trowel
Berries (Elderberry, Rose Hips)

When: Fully coloured and slightly soft to touch
How:
- Elderberries: Cut entire clusters with scissors
- Rose hips: Pluck individually when deep orange/red and slightly soft (after first frost in frost-prone areas like Central Otago and Canterbury, or late April-May in coastal/northern regions that don’t experience frost)
How much: Leave plenty for birds and wildlife
Tool: Scissors, gloves for thorny plants
Seeds (Fennel, Queen Anne’s Lace)
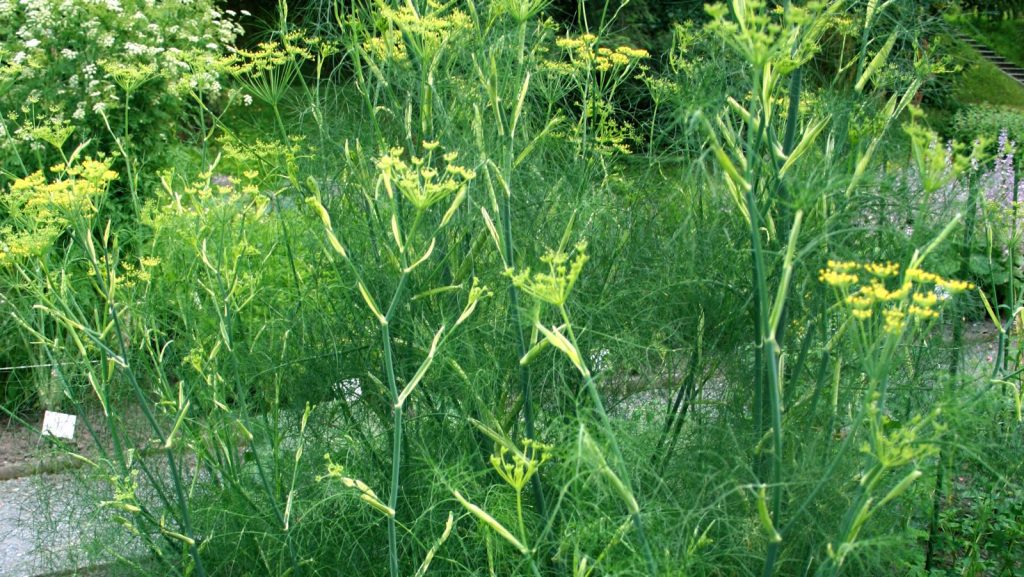
When: Seed heads dried on plant but before they shatter
How: Cut seed heads into paper bag (catches falling seeds)
How much: Leave some seeds for plant reproduction
Tool: Scissors and paper bag
New Zealand-Specific Harvesting
Important Cultural Context
Rongoā Māori is a complete traditional healing system with its own protocols, spiritual practices, and cultural frameworks that extend far beyond plant harvesting techniques.
For traditional rongoā Māori uses and protocols: Please consult with qualified rongoā practitioners. This guide covers botanical harvesting from a Western herbalism perspective and does not represent traditional Māori healing practices.
To find qualified rongoā practitioners: Contact Te Paepae Motuhake (Rongoā Standards Authority) or ask at your local marae, Māori health provider, or community health centre.
The information below focuses on botanical and sustainability considerations for these plants and should not be considered rongoā Māori instruction.
Kawakawa (Piper excelsum)
When: Year-round, though some suggest late summer (February-March) for peak volatile oils
How: Select 2-3 leaves per plant maximum; spread harvest across multiple plants (minimum 10 plants for meaningful harvest)
Cultural note:
- Leaves with holes (from kawakawa looper moth) are traditionally preferred and culturally significant
- Harvest respectfully—this is a taonga (treasure)
- Consider offering karakia (prayer) or thanks before harvesting if this aligns with your practice, or simply maintain mindful, respectful approach
- Never strip all leaves from one plant
Sustainability: Allow 6-12 months before re-harvesting same plant
Tool: Fingers or scissors
Horopito (Pseudowintera colorata)
When: Year-round (evergreen)
CRITICAL CONSERVATION INFORMATION:
- Horopito is slow-growing (10-20 years to reach harvesting maturity)
- Only harvest from cultivated plants—purchase seedlings from native plant nurseries (available throughout NZ)
- Never wild-harvest from native bush, reserves, or DOC land
- If you must harvest from established wild plants (with explicit landowner permission only):
- Plant must be minimum 3-4 years old and well-established
- Take maximum 1-2 leaves per plant
- Harvest from maximum 10-15% of plant’s foliage
- Allow 12 months regeneration before re-harvesting
How: A few leaves only per plant
Note: Very peppery taste indicates high medicinal compound content (polygodial)
Cultivation strongly encouraged: Reduces pressure on wild populations; ensures sustainable personal supply
Mānuka (Leptospermum scoparium)

When: Year-round for leaves
How: Small handfuls from multiple plants; never strip branches
Sustainability: Common in many areas but still harvest respectfully
Note: Leaves can be dried for tea; flowers produce medicinal honey (if you keep bees)
Urban Foraging in NZ
Don’t have a garden or access to wild spaces? You can still harvest herbs in cities:
Parks and Reserves
- Many NZ councils allow personal harvesting of common plants (plantain, dandelion, cleavers)
- Check regulations: Visit your local council website or call parks department
- Auckland, Wellington, Christchurch, Dunedin all have foraging-friendly parks (with guidelines)
- Avoid: Paths, dog exercise areas, recently mowed/sprayed sections
- Popular spots: Town belts, coastal reserves, community parks
- Always: Stay on designated paths, take only small amounts
Community Gardens
- Many welcome members to harvest excess herbs
- Extensive networks in Auckland, Wellington, Christchurch, Hamilton
- Search “[your city] community garden” online
- Often have workshops on growing and using herbs
- Great place to learn identification from experienced gardeners
Balcony/Windowsill Growing
- Grow your own harvest in pots—full control over timing
- Easy to grow in containers: Calendula, nasturtium, mint, basil, thyme, parsley
- Even a sunny windowsill can produce medicine
- Harvesting your own means perfect timing control
- Seeds/seedlings available from The Warehouse, Mitre 10, Bunnings, garden centres
Foraging Groups and Workshops
- Join local foraging walks to learn identification
- Auckland Botanic Gardens, Otari-Wilton’s Bush (Wellington), and regional botanic gardens often run workshops
- Search social media for “[your city] foraging” groups
- Learn from experienced foragers before going solo
- Network with other urban foragers to share knowledge
Roadside and Wasteland Foraging
- Contamination concerns: Avoid within 10 metres of roads (exhaust residue, lead)
- Look for: Railway corridors (check council permission), vacant lots, creek sides
- Check for spraying: Look for recent mowing, browning, or spray residue
- When in doubt, don’t harvest
Budget-friendly note: Foraging is free medicine, but requires knowledge investment (time learning identification, possibly field guide or workshop cost). Start with abundant, easy-to-identify plants (plantain, dandelion).
Sustainable Harvesting Practices
The 1/3 Rule
Never harvest more than 1/3 of any wild plant population.
This applies to:
- Individual plants (don’t strip all leaves from one plant)
- Plant populations (if there are 20 dandelions, harvest from maximum 6-7 plants)
Plant Population Health Check
Before harvesting, ask yourself:
- Is this plant abundant here?
- Does the population look healthy?
- Are there plenty of plants I’m NOT harvesting?
- Will this population recover quickly?
If you answer “no” to any of these, move to a different location or choose a different plant.
Invasive vs. Native Species
Harvest more liberally from invasive species:
- Plantain
- Dandelion
- Nasturtium
- Cleavers (in some areas)
Harvest conservatively from natives:
- Kawakawa (max 2-3 leaves per plant, across multiple plants)
- Horopito (cultivated plants only)
- Any NZ native plant
- Follow DOC guidelines (see Safety section)
Tools You’ll Need
Essential:
- Sharp scissors or pruning shears
- Basket or paper bag (breathable containers)
- Gloves (for nettles, thorny plants)
Helpful:
- Digging fork (for roots)
- Paper bags (for seeds)
- Field guide for NZ plants:
- Knox, J. The Forager’s Treasury (NZ-specific, excellent photos, $45-55)
- NZ Plant Conservation Network website (free, comprehensive native plant info): www.nzpcn.org.nz
- iNaturalist app (free plant ID help from community, upload photos for identification)
- Local library often has field guides available for loan
- Garden kneeler (for low-growing plants)
Never use:
- Plastic bags (plants “sweat” and degrade)
- Dull tools (damage plants unnecessarily)
Can’t afford tools? You can still harvest:
- Use kitchen scissors instead of pruning shears
- Fingers work for many flowers and leaves
- Borrow digging tools from friends, neighbours, or tool libraries (Auckland, Wellington, Christchurch have community tool libraries)
- Start with plants that don’t need special tools (calendula flowers, plantain leaves, dandelion greens)
Immediate Post-Harvest Care
Within 2-4 hours of harvesting:
- Sort: Remove any damaged, diseased, or insect-infested material
- Rinse (if needed): Gently rinse in cool water if dirty; shake off excess
- Process: Begin drying or using immediately
Why speed matters: Once harvested, enzymes in plant cells start breaking down the very compounds you want to preserve. Fast processing wins the race against degradation.
Next Step: Storage (covered in detail in the Storage Guide)
Quick preview:
- Dried herbs: Airtight jars, dark location, labelled with herb name and date
- Fresh herbs: Use immediately or refrigerate maximum 2-3 days
- Roots: Clean thoroughly and dry before long-term storage
- Pro tip: Only harvest what you can process same day—better to make multiple small trips than lose a large harvest to degradation
How to Tell a Plant is Ready
Visual Cues for Optimal Harvest
Leaves:
- Vibrant colour (deep green, not pale or yellowing)
- Full-sized for the species
- Firm texture (not limp or wilting)
- No significant pest damage or disease spots
Flowers:
- Fully open (not still in bud, not past prime)
- Petals bright and intact (not browning at edges or dropping)
- Fresh appearance (not faded or dried on plant)
- Strong colour and aroma
Roots:
- Aerial parts dying back or dormant (energy has moved underground)
- Plant has completed at least one full growing season
- Soil is workable (not waterlogged, not rock-hard dry)
Berries:
- Full colour development (deep purple, red, orange as appropriate)
- Slight softness when gently squeezed
- Come away from plant easily when touched
- No shrivelling or mold
What to Avoid
Don’t harvest:
- Yellowing, spotted, or diseased leaves
- Flowers past their prime (browning, dropping petals, going to seed)
- Drought-stressed plants (limp, pale, undersized leaves)
- Waterlogged or frost-damaged plants
- Plants near roadsides, sprayed areas, or contaminated sites
- Anything you can’t identify with 100% certainty
Common Mistakes to Avoid
✖ Harvesting too much: Taking more than 1/3 of a plant or population
✖ Wrong time of day: Midday or evening harvests have lower volatile oils
✖ Wet conditions: Harvesting in rain or heavy dew promotes mold
✖ Flowering leaves: Leaves harvested after flowering are often bitter and less potent
✖ Delayed processing: Letting harvested plants sit for hours before drying
✖ No identification: Harvesting plants you’re not 100% certain about
✖ Contaminated locations: Harvesting near roads, sprayed areas, or polluted sites
✖ Ignoring regulations: Harvesting from DOC land, private property, or protected areas without permission
Quick Reference: What to Harvest When
| Season | What to Harvest | Examples |
|---|---|---|
| Spring (Sept-Nov) | Young leaves, early flowers | Nettle, dandelion greens, cleavers, chickweed |
| Summer (Dec-Feb) | Flowers, aromatic leaves | Calendula, chamomile, lavender, nasturtium |
| Autumn (Mar-May) | Roots, late berries, seeds | Dandelion root, elderberry, rose hips |
| Winter (Jun-Aug) | Evergreen natives, stored roots | Kawakawa, pine needles, mānuka |
When to Seek Different Plants
Sometimes the ideal harvest window has passed. That’s okay! Options:
- Wait for next season: Mark the location and return at optimal time
- Harvest a different plant part: Can’t get leaves? Maybe roots are ready
- Choose a different plant: Plenty of herbs have similar properties
- Purchase dried herbs: NZ suppliers include:
- Cottage Hill Herbs (online, NZ-grown organic herbs)
- Herbshop NZ (online, wide selection)
- Go Native (NZ natives and rongoā)
- Commonsense Organics (in-store: Auckland, Wellington; online nationwide)
- Bin Inn, health food stores (bulk dried herbs in most cities)
- Prices: ~$15-30 per 100g depending on herb and source
First-Time Harvester? Start Here
New to harvesting? Build your skills progressively:
Week 1: Garden Herbs (Easiest)
- Harvest: Mint or rosemary from your own garden or friend’s
- Timing: Mid-morning, before flowering
- Goal: Practice cut-above-node technique, observe regrowth over next weeks
- Success indicator: Plant continues thriving, regrows bushy
Week 2: Common Forageables (Low-Risk)
- Harvest: Plantain or dandelion greens (abundant invasives)
- Timing: Spring morning after dew dries
- Goal: Practice population assessment, sustainable harvesting principles
- Success indicator: Confident identification, respectful harvest amount
Week 3: Flowers (Timing-Sensitive)
- Harvest: Calendula or nasturtium (if in season)
- Timing: Dry morning, fully open blooms
- Goal: Learn delicate flower handling, immediate processing importance
- Success indicator: Flowers retain colour and aroma after drying
Month 2+: Expand Your Knowledge
- Try roots (autumn), seeds (late summer), or native plants (with research)
- Keep a harvest journal noting timing, weather, plant response
- Note what works in YOUR specific location and microclimate
- Join foraging groups or workshops to learn from experienced harvesters
Safety Reminders
Legal & Ethical:
✓ 100% certain plant identification before harvesting
✓ Permission obtained for private land
✓ Check harvesting regulations:
- DOC land: Generally NO harvesting allowed without special permit
- Council parks: Varies by region; check local council website or phone parks department
- Regional parks: Often allow small personal harvests; check specific park rules
- Private land: Always get explicit permission from landowner
✓ Legal note: Many NZ native plants are protected by law; check NZPCN conservation status
Safety & Sustainability:
✓ Avoid contaminated areas (within 10m of roadsides, sprayed zones, industrial sites)
✓ Leave plenty for wildlife, pollinators, and plant regeneration
✓ Start small—try a little of any new plant first
✓ Wash hands after handling unknown plants
✓ When in doubt, don’t harvest
Resources for Legal Foraging:
- DOC website: www.doc.govt.nz (search “foraging” or “plant collecting”)
- Your local council website (search “park bylaws” or “foraging”)
- NZ Plant Conservation Network: www.nzpcn.org.nz (check conservation status)
Final Thoughts
Harvesting herbs is both art and science. Yes, there are optimal times and methods. But herbalism is also about relationship—with plants, with seasons, with place.
As you harvest, notice patterns. That patch of plantain in your backyard might have different timing than the one in the park. That calendula might keep flowering later into autumn than expected. Your observations over time become your personal harvesting calendar, specific to your location.
Start simple: Pick one herb. Learn its rhythm. Harvest it well. Then add more plants to your repertoire.
The plants are generous. Respect their timing, and they’ll give you potent medicine season after season.
Sources & Further Reading
Books:
- Knox, J. (2013). The Forager’s Treasury: The Essential Guide to Finding and Using Wild Plants in Aotearoa New Zealand. Penguin Random House NZ.
- Cech, R. (2000). Making Plant Medicine. Horizon Herbs.
- Thayer, S. (2006). The Forager’s Harvest: A Guide to Identifying, Harvesting, and Preparing Edible Wild Plants. Forager’s Harvest Press.
Scientific Articles:
- Baranauskienė, R., et al. (2013). Influence of growth stage on the essential oil composition of various herbs. Journal of Essential Oil Research.
- Müller, J., & Heindl, A. (2006). Drying of medicinal plants. In: Medicinal and Aromatic Plants. Springer.
New Zealand Resources:
- Riley, M. (1994). Māori Healing and Herbal: New Zealand Ethnobotanical Sourcebook. Viking Sevenseas NZ Ltd.
- Brooker, S. G., Cambie, R. C., & Cooper, R. C. (1987). New Zealand Medicinal Plants. Heinemann Publishers.
- New Zealand Plant Conservation Network: http://www.nzpcn.org.nz
- Te Paepae Motuhake (Rongoā Standards Authority) – for qualified rongoā practitioners
Online Tools:
- iNaturalist app (free plant identification help)
- NZ Foraging Facebook groups (search “[your city] foraging”)
Disclaimer: This guide is for educational purposes only. Correct plant identification is essential and solely your responsibility. Always harvest sustainably and legally. Respect private property, conservation areas, and indigenous plant knowledge. This guide presents Western botanical approaches and does not represent rongoā Māori traditional knowledge or practice. For traditional Māori healing uses, consult qualified rongoā practitioners. When in doubt, don’t harvest.
Note on Pricing: All prices mentioned in this guide are approximate and based on New Zealand suppliers as of December 2025. Prices vary by supplier, season, and market conditions. We recommend checking current prices with your local suppliers.
