A Beginner’s Guide to Harvesting Wild Plants Safely
Foraging—finding and harvesting wild plants—is one of the most rewarding ways to connect with nature and access free, nutritious herbs. It’s about building a relationship with the land around you, whether that’s a city park, your backyard, or native bush.
This guide will help you start safely and respectfully, with clear rules and practical advice for New Zealand conditions.
What is Foraging? (And What is Wildcrafting?)
Foraging is simply gathering wild plants for food or medicine. Wildcrafting is foraging with extra care—focusing on sustainable, ethical harvesting that respects the ecosystem.
Why forage?
- It’s free: Many medicinal and edible plants grow abundantly as “weeds”
- It’s fresh: You control when and where you harvest
- It connects you to place: You learn to see your local environment differently
- It’s empowering: You become less dependent on shops for herbs
What you can forage:
- Common introduced “weeds” (plantain, dandelion, cleavers)
- Some native plants where very abundant (kawakawa, puha—with cultural respect)
- Edible plants (young dandelion greens, purslane, nasturtium)
- Medicinal herbs (plantain for bites, cleavers for lymphatic support)
The Golden Rules: Non-Negotiable Safety
These rules apply EVERY TIME you forage. No exceptions.
Rule 1: 100% Certainty or Don’t Touch It
Never use a plant unless you’re absolutely certain of its identity.
Why this matters: New Zealand has poisonous plants that look similar to edible ones. Hemlock (Conium maculatum) grows here and is deadly—it can resemble other plants in the carrot family.
How to identify safely:
- Use multiple identification features (leaf shape, stem, smell, habitat, flowers)
- Cross-reference with at least TWO reliable field guides
- When starting, go with an experienced forager
- Learn ONE plant thoroughly before moving to the next
- Take clear photos for comparison
Your brain will try to trick you: We naturally want to see what we’re looking for (confirmation bias). Fight this by actively looking for differences, not just similarities.
Rule 2: The 1/10th Rule (Actually, Make it 1/20th)
Never take more than 5-10% of any plant population in one area.
Why this matters:
- Plants need population density to reproduce successfully
- Wildlife depends on these plants for food
- Over-harvesting can eliminate local populations
- Some plants take years to recover from damage
In practice:
- If you see 20 plantain plants, take leaves from 1-2 plants maximum
- Spread your harvest across a wide area, not all from one spot
- For abundant introduced weeds (plantain, dandelion), you have more flexibility
- For native plants (kawakawa), be extra conservative
Rule 3: Know Your Location Hazards
Only harvest from clean, safe areas.
NEVER harvest from:
- Roadsides within 10 metres of road (heavy metals from vehicles, exhaust fumes)
- Sprayed areas: Parks, sports fields, council reserves (often sprayed with herbicides)
- Industrial zones: Old factories, contaminated sites
- Dog walking areas: Parasites and bacteria from feces
- Polluted waterways: Agricultural runoff, sewage
SAFE harvest locations:
- Your own unsprayed garden
- Friends’/family’s organic gardens (with permission)
- Known unsprayed areas in bush
- Clean, unpolluted rural areas (with permission)
When in doubt: Ask the local council if an area is sprayed. Many councils have spray schedules available.
Why this matters: Plants absorb what’s in the soil and air. Lead from historical petrol, herbicide residues, heavy metals—all can accumulate in plant tissues and end up in your body.
Rule 4: Start Small with New Plants
Even with correct identification, try only a small amount first.
Why this matters:
- Individual allergies and sensitivities exist for any plant
- Your body needs time to adjust to new plant compounds
- Some people react to plants that are generally safe for others
The protocol:
- Make a weak tea or eat a small amount (a few leaves)
- Wait 24 hours
- Watch for reactions: rash, digestive upset, headache
- If all is well, gradually increase amount
- One new plant at a time—don’t try multiple new plants simultaneously
Rule 5: Respect the Source
Leave the ecosystem better than you found it.
- Leave roots intact unless specifically harvesting roots (and population is very abundant)
- Harvest from healthy plants only—diseased plants won’t help you and weakening them further harms the population
- Clean cuts: Use scissors or sharp knife for clean cuts that heal well
- Scatter harvesting: Take a little from many plants rather than a lot from one
- Give back: Consider removing invasive weeds, planting natives, or simply offering thanks
Understanding NZ Foraging Laws
Public Conservation Land (DOC Land)
Can you forage on DOC land? It’s complicated.
- Generally NOT allowed for commercial purposes without permits
- Personal, small-scale gathering of common plants (like dandelion) is usually tolerated in areas that aren’t specially protected
- National Parks, Nature Reserves, Wildlife Sanctuaries: Often have stricter rules—best to ask first
- Threatened or rare plants: NEVER harvest these, even if abundant where you are
Best practice: Contact the local DOC office before foraging on conservation land. They can tell you what’s allowed in specific areas.
More info: doc.govt.nz
Private Land
Always get permission from landowners. Foraging without permission is trespassing.
Council Land & Parks
Most councils spray for weeds. Assume sprayed unless confirmed otherwise. Contact your council to ask about:
- Spray schedules
- Which parks/reserves are sprayed
- Whether any areas are maintained organically
Coastal Areas
Some coastal plants are protected. Check DOC guidelines for your specific region.
Your Beginner’s Foraging Kit
You don’t need much to start!
Essential Equipment:
- Field guide(s): At least two reliable guides for cross-reference (see recommendations below)
- Sharp scissors or knife: For clean cuts
- Basket or paper bag: Breathable containers (not plastic—plants sweat and degrade)
- Gloves: For nettles and prickly plants
- Notebook and pen: Record location, date, conditions (builds your knowledge over time)
Nice to Have:
- Camera/phone: For photographing plants to study later
- Magnifying glass: For examining tiny features
- Plant press: If you want to create a personal herbarium
- Foraging bag/apron: With multiple pockets
NZ Field Guide Recommendations:
- A Field Guide to the Native Edible Plants of New Zealand by Andrew Crowe
- The Forager’s Treasury by Johanna Knox
- Edible Weeds of New Zealand (various authors)
- iNaturalist app (crowd-sourced identification—helpful but verify with books)
Budget tip: Check libraries, second-hand bookshops, or join foraging groups where people share resources.
Five Safe Plants to Start With
Start with plants that are distinctive, abundant, and have no dangerous look-alikes.
1. Plantain (Plantago major/lanceolata)


Why start here: Virtually impossible to mistake for anything dangerous, grows everywhere
Identification:
- Basal rosette of leaves
- Distinctive parallel veins running length of leaf (most plants have branching veins)
- Two types: broad-leaved (P. major) or narrow ribbed (P. lanceolata)
- Grows in lawns, pathways, compacted soil
Uses: First aid for insect bites, stings, minor cuts (crush fresh leaf, apply directly)
Harvest: Pick outer leaves, leave centre intact for regrowth
2. Dandelion (Taraxacum officinale)
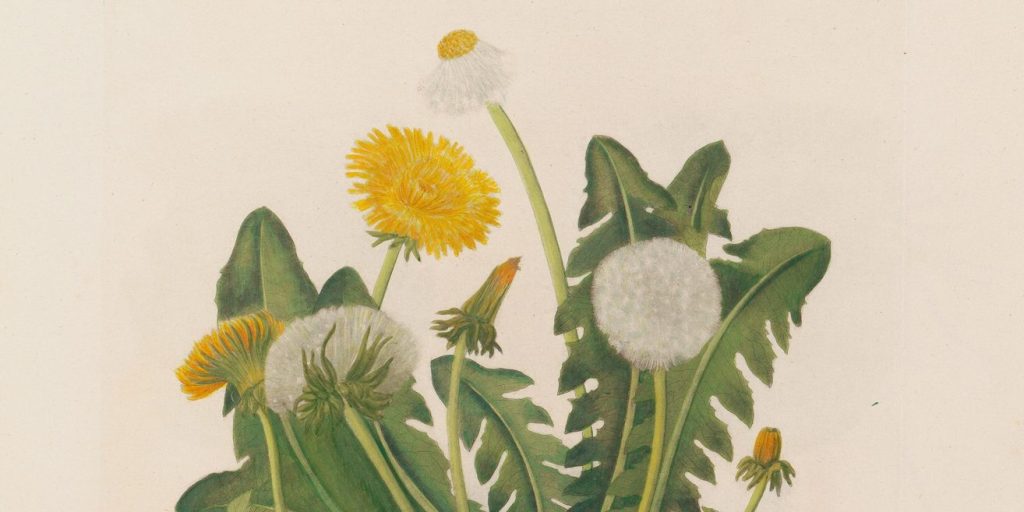
Why start here: Bright yellow flower makes it easy to spot, no dangerous look-alikes in NZ
Identification:
- Bright yellow flower heads (turn into white “clocks”)
- Deeply toothed leaves in basal rosette
- Single hollow stem per flower
- Milky white sap when broken (distinctive!)
- Deep taproot
Uses: Young leaves in salads (bitter, nutritious), root as coffee substitute, flowers for wine
Harvest: Gather young leaves in spring before flowering (less bitter). Dig roots in autumn when energy is stored there.
3. Cleavers (Galium aparine)
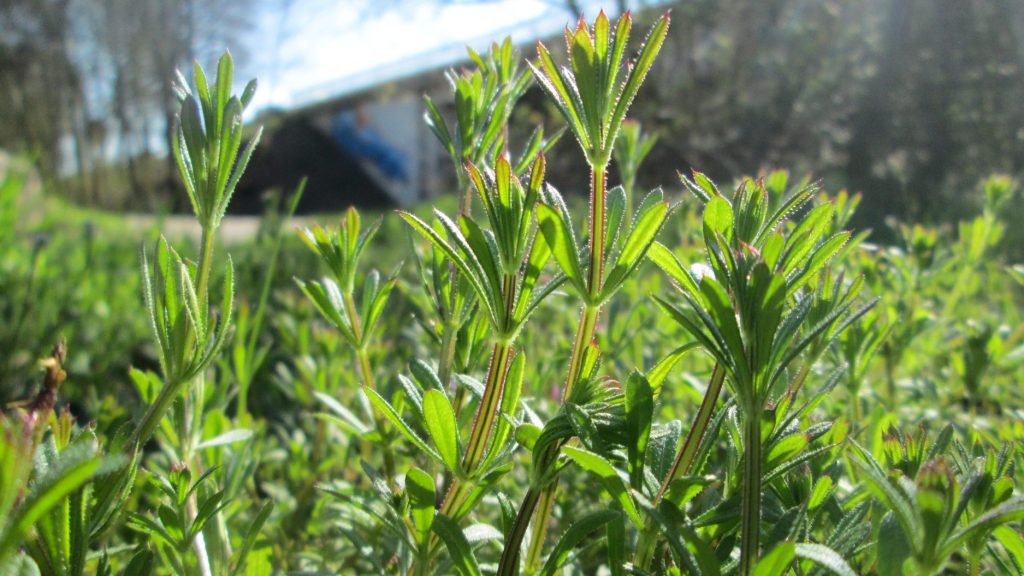
Why start here: Distinctive sticky texture, very common, no toxic look-alikes
Identification:
- Sticky, Velcro-like stems and leaves
- Square stems
- Leaves in whorls of 6-8 around stem
- Small white flowers
- Found in damp, shaded areas
Uses: Lymphatic support, mild diuretic, spring tonic tea
Harvest: Collect young growing tips in spring. Whole above-ground plant is used.
4. Kawakawa (Piper excelsum)
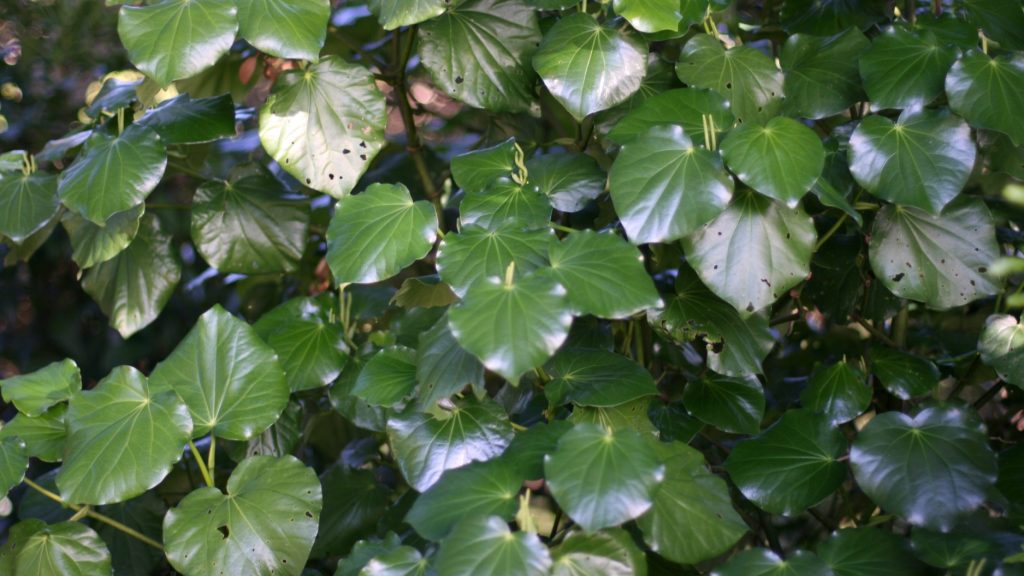
Why start here: Distinctive heart-shaped leaves, aromatic, common in North Island
Identification:
- Heart-shaped leaves (distinctive!)
- Aromatic when crushed (peppery scent)
- Often has holes from kawakawa looper moth (this is normal and actually traditionally significant)
- Native shrub/small tree
- Orange fruits on female plants
Uses: Digestive support, skin healing, traditional rongoā Māori plant
Harvest: Pick a few leaves from different plants. Harvest respectfully—this is a taonga (treasure) to Māori. Leave plenty for regeneration and wildlife.
Cultural note: Kawakawa is central to rongoā Māori. When harvesting, do so with respect for this tradition. Consider offering thanks to the plant.
5. Nasturtium (Tropaeolum majus)
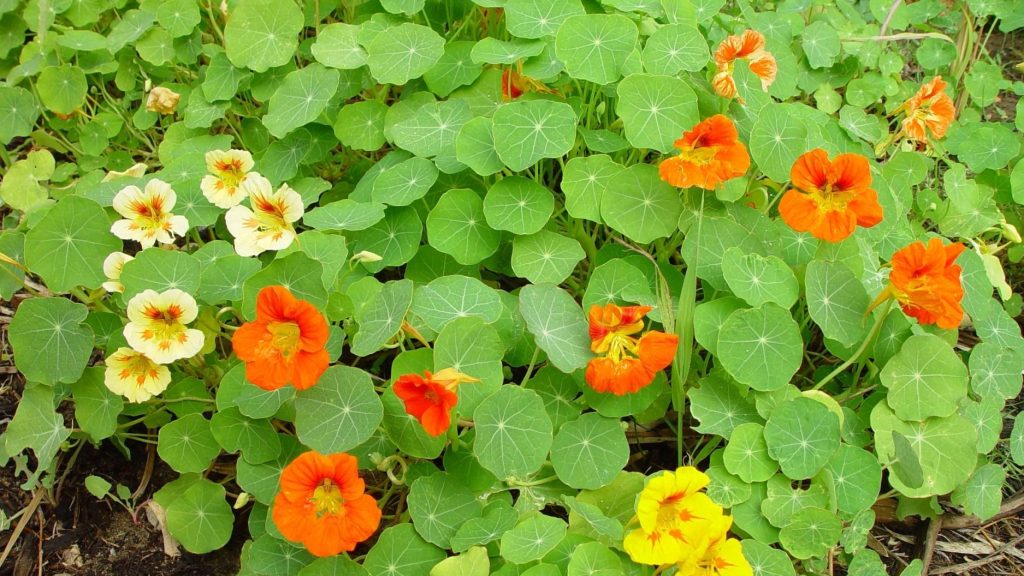
Why start here: Distinctive round leaves and bright orange/yellow flowers, grows abundantly, tasty!
Identification:
- Round, shield-shaped leaves
- Bright orange, yellow, or red flowers with a spur
- Climbing or trailing habit
- Peppery taste
- Garden escape, common in NZ
Uses: Leaves and flowers edible (peppery salad addition), antimicrobial properties, high in vitamin C
Harvest: Pick leaves and flowers freely—this plant grows vigorously
When to Harvest
Timing affects potency and flavour.
General Guidelines:
- Morning after dew dries: Best concentration of compounds, less moisture (easier drying)
- Before flowering: For most leafy herbs (peak medicinal compounds)
- During flowering: For flowers themselves
- Autumn: For roots (energy has moved underground for winter storage)
- Spring: For young greens and shoots (tender, less bitter)
Seasonal Calendar (NZ):
- Spring (Sept-Nov): Cleavers, young dandelion greens, nettle tops, chickweed
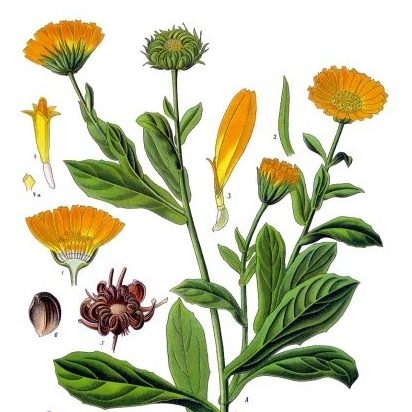
- Summer (Dec-Feb): Flowers (calendula if grown, nasturtium), kawakawa leaves
- Autumn (Mar-May): Roots (dandelion, burdock), rose hips
- Winter (Jun-Aug): Kawakawa leaves (year-round), some roots
Processing Your Harvest
Cleaning:
- Shake off insects and debris
- Rinse briefly in cool water if dirty (avoid soaking—leaches compounds)
- Inspect for damage, insects, contamination
- Pat dry gently
Immediate Use:
- Use fresh for teas, poultices, or cooking
- Fresh is most potent for plants like lemon balm
Drying for Storage:
- Spread in single layer on clean cloth or screen
- Place in warm, dark, airy spot (not direct sun—degrades compounds)
- Turn daily
- Ready when leaves crumble easily (3-7 days depending on humidity)
- Store immediately in airtight jars away from light
Signs of poor drying:
- Mold (white fuzzy growth)
- Damp smell
- Leaves bend instead of crumble
If you see these, discard and try again.
Common Beginner Mistakes
Mistake 1: Over-confidence
“I think that’s plantain” = Don’t use it. “I know with 100% certainty that’s plantain” = Use it.
Mistake 2: Harvesting too much
Taking half the dandelions in a patch feels like “only half,” but it’s way too much. Take 10% maximum.
Mistake 3: Assuming organic equals safe
Even organic areas can have soil contamination from historical use. Know the land’s history.
Mistake 4: Trying to learn too many plants at once
Learn 3-5 plants thoroughly first. Master those, then add more.
Mistake 5: Ignoring seasonal changes
Plants look different through their life cycle. Learn to recognise them at all stages.
Mistake 6: Not checking regulations
“It’s on public land so it’s fine” = Not always true. Check first.
Building Your Foraging Practice
Week 1: Learn ONE Plant
- Choose plantain (easiest to start)
- Find it in 5 different locations
- Photograph it
- Observe it closely
- Don’t harvest yet—just observe
Week 2-4: Deep Dive
- Sketch the plant
- Make notes on habitat, season, variations you see
- Smell it, touch it (if safe)
- Look for it in all seasons
- Begin small harvests after you’re 100% certain
Month 2: Add ONE More Plant
- Repeat the same careful process
- Don’t rush
Month 3+: Expand Thoughtfully
- Join local foraging group
- Go on guided foraging walks
- Build community with other foragers
- Share knowledge and harvests
Finding Community & Learning More
NZ Foraging Groups:
- Check Facebook for local foraging groups in your region
- Meetup.com often has foraging walks
- Community gardens frequently have knowledgeable members
Courses & Workshops:
- Many herbalists offer foraging workshops
- DOC occasionally runs plant identification walks
- Local botanical gardens often have programs
Online Resources:
- iNaturalist (app and website) for plant ID help
- NZ Plant Conservation Network (nzpcn.org.nz)
- DOC website for native plant info
The Mindset of a Responsible Forager
Foraging is a relationship, not just taking.
Before you harvest:
- Take a moment to observe the whole area
- Notice what else is growing there
- Consider what wildlife depends on this plant
- Harvest only if there’s genuine abundance
While harvesting:
- Move slowly and mindfully
- Take from multiple plants, not one
- Leave the area looking largely untouched
- Pick up any litter you see
After harvesting:
- Offer thanks (to the plant, the land, however feels meaningful to you)
- Consider giving back: pull an invasive weed, plant a native, support conservation efforts
Relationship with Rongoā Māori:
If harvesting native plants like kawakawa:
- Acknowledge this is a taonga (treasure) of Māori culture
- Harvest with extra care and respect
- Take only what you need
- Consider learning more about rongoā Māori from Māori practitioners
- Support Māori-owned businesses that sell these plants sustainably
When NOT to Forage
Sometimes the responsible choice is to not forage at all.
Don’t forage if:
- You’re not 100% certain of identification
- The plant population is small or struggling
- The area has been or might be sprayed
- It’s in a protected conservation area without permission
- The plant is rare or threatened
- You’re feeling rushed or distracted
- Weather has been very dry (plants are stressed)
Alternative: Grow your own! Many foraged plants grow easily in gardens.
Your First Foraging Trip: A Checklist
Before you go:
- [ ] Field guide(s) in bag
- [ ] Scissors/knife sharpened
- [ ] Basket or paper bag ready
- [ ] Notebook and pen
- [ ] Gloves (for nettles)
- [ ] You’ve identified your target plant in books
- [ ] You know the area is safe (no spraying, not roadside)
- [ ] You have permission if on private land
While foraging:
- [ ] Positive identification confirmed
- [ ] Population is healthy and abundant
- [ ] Taking only 5-10% maximum
- [ ] Clean cuts with sharp scissors
- [ ] Leaving roots intact (unless specifically harvesting roots)
- [ ] Recording location and date in notebook
After foraging:
- [ ] Process herbs promptly (clean, dry)
- [ ] Store properly
- [ ] Make notes on what worked, what didn’t
- [ ] Update your foraging journal
Safety Summary
The Big Three Safety Rules:
- 100% identification certainty—lives depend on this
- Clean locations only—contamination is invisible
- Start small—individual reactions vary
Follow these three, and you’ll forage safely.
Final Encouragement
Foraging connects you to your local environment in a profound way. You’ll start noticing plants you walked past for years. You’ll understand seasons differently. You’ll feel more rooted in place.
Start slow. Start safe. Start with one plant. Build from there.
The land is generous. Learn to receive its gifts with respect, gratitude, and care.
Happy foraging!
Quick Reference: Common Foraging Questions
Q: Can I forage in my local park?
A: Check with your council firs—most spray for weeds. Even if they don’t spray, get confirmation.
Q: How do I know if an area has been sprayed?
A: Contact the local council or landowner directly. Don’t assume.
Q: Is it legal to forage on DOC land?
A: For personal, small-scale use of common plants (like dandelion), generally yes in non-protected areas. But check with local DOC office for specific locations.
Q: What if I see someone else harvesting unsustainably?
A: Politely educate if possible. Model good behavior. Support local foraging ethics through your community.
Q: Can I sell foraged plants?
A: This gets into commercial activity which requires permits, food safety compliance, and potentially concessions on public land. Start with personal use.
Q: What about foraging mushrooms?
A: Mushroom foraging requires specialised knowledge. Many poisonous mushrooms look similar to edible ones. Start with plants; consider mushrooms only with expert guidance.
Sources & Further Reading
Books:
- Crowe, A. (2004). A Field Guide to the Native Edible Plants of New Zealand. Penguin Books.
- Knox, J. (2013). The Forager’s Treasury: The Essential Guide to Finding and Using Wild Plants in Aotearoa New Zealand. Penguin Random House NZ.
- Thayer, S. (2006). The Forager’s Harvest: A Guide to Identifying, Harvesting, and Preparing Edible Wild Plants. Forager’s Harvest Press.
Online Resources:
- Department of Conservation: www.doc.govt.nz
- NZ Plant Conservation Network: www.nzpcn.org.nz
- iNaturalist: www.inaturalist.org
- Healthify He Puna Waiora: www.healthify.nz
Scientific Background:
- Cunningham, A.B. (2001). Applied Ethnobotany: People, Wild Plant Use and Conservation. Earthscan Publications.
Disclaimer: Does not represent rongoā Māori practices. For rongoā knowledge, consult Te Paepae Motuhake.
Medical Disclaimer: This guide is for educational purposes only. Foraging carries inherent risks including misidentification, contamination, and allergic reactions. The author and publisher are not responsible for any adverse effects resulting from use of this information. You are solely responsible for your safety and for confirming plant identity before handling or consuming. Always consult multiple reliable sources and qualified experts. When in doubt, don’t consume.
Note on Pricing: All prices mentioned in this guide are approximate and based on New Zealand suppliers as of December 2025. Prices vary by supplier, season, and market conditions. We recommend checking current prices with your local suppliers.
